Swaddling cloths, also known as afghans, are versatile pieces of fabric that can be used to wrap newborn babies or to cover or drape them over during naps. Here, we will introduce various ways to make swaddling cloths, from simple ones that only require sewing together pieces of fabric, to unusual star-shaped ones. Patchwork and quilted swaddling cloths are often feared to be difficult, but they can be easily made using the kits introduced in the second half of this article! First, check out the instructions here to see what level you think you can make them at.

4 ways to make your own swaddling blanket
There are many baby items that are necessary after giving birth, but have you ever wanted to make something with your own design and fabric texture? It’s nice to have something simple that you can make while you have time during pregnancy. This time, we will introduce how to make a swaddling cloth from among such baby items. It’s
easy to make, so even beginners in sewing should give it a try! First, let’s take a look at four ways to make it.
*When using a swaddling cloth, the baby’s legs should basically be spread in an M shape. Closing or stretching the legs can cause dislocation of the hip joint. When using a swaddling cloth, be careful not to interfere with the movement of the baby’s legs.
1. You can even reuse bath towels!
This is a simple swaddling cloth that can be made with just the outer and inner fabrics. Depending on the material of the fabric, it can also be used as a nap mat or a blanket. You can
purchase cute fabrics for this purpose, but if you have a bath towel that you like, you can reuse it. Try changing the color of the thread to make a nice accent.
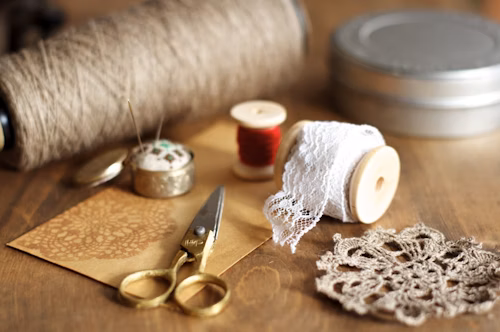
material
Outer fabric (double gauze recommended) 1m for a width of 110cm
Inner fabric (terry cloth, triple gauze, waffle fabric, etc. recommended) approx. 70cm x 82cm
How to make it
1. Cut the fabric to the specified size.
2. Fold the hood fabric with the front sides facing outwards into a triangle and sew 5mm with a waste stitch.
*Sew the waste stitch temporarily to prevent it from shifting. Sew 5mm from the edge so that it does not show on the outside.
3. Place the triangular fabric for the hood on top of the lining fabric (front). (Either the left or right side of the hood is fine, whichever is easier to use)
4. Place the outer fabric (back) on top of that.
5. Make a mark 4cm from the edge and draw a curved line.
6. Sew 1cm from the edge. Be careful not to use the overlapping part of the hood as the return hole for the sewing machine. At
this time, there are some areas that should not be sewn, so align the start of the sewing machine so that these areas end up being the end of the stitching
7. Cut off the unnecessary fabric at the corners and make several slits in the curved parts.
(Be careful not to cut through the seam sewn in step 6.)
8. Turn it right side out using the opening that was not sewn in step 6. Trim it neatly and hand sew the opening.
9. Trim it neatly and stitch all the way around 1 cm from the edge, and it’s finished!
Stitching will increase the strength.
This is from “Tsuki to Minori,” a website that provides information on food and lifestyle. The link below has detailed instructions with images.
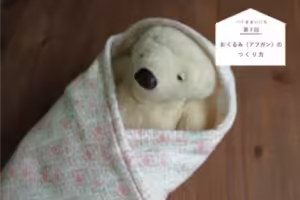
2. They look like animal ears! The cute shape is the key

You’ve probably seen this type of swaddling cloth before when you went out to buy baby products. Even if you’re hesitant and think, “This looks so difficult, I can’t make it!”, after seeing how to make it, you might think, “Maybe even I can do it.” Swaddling
cloths with ears are surprisingly easy to make. Please give it a try!
material
– 1 outer fabric (90 x 90 cm)
– 1 inner fabric (90 x 90 cm)
– 1 hood fabric (30 x 30 cm) –
4 pieces of ear fabric (approx. 9.5-10 cm x 7-7.5 cm)
*Please take into consideration that there will be a 1 cm seam allowance, and prepare fabric that matches the finished size.
How to make it
1. Cut the fabric and prepare the materials.
2. Fold the hood fabric in half with the front sides facing outwards to create a triangle, then iron.
3. Put the two pieces of selvedge fabric together, then sew them inside out. Once sewn, turn it inside out and tidy up. 4.
Temporarily attach the two selvedge to the hood fabric prepared in 2. (Position is up to you)
5. Place the lining fabric right side up, then place the hood fabric from 4 on top of it, matching the corners.
6. Place the outer fabric on top of 5. At this time, the outer fabric should be wrong side up.
7. Sew all the way around, leaving a 1cm seam allowance as a guide. Don’t forget to leave about 20cm of space unsewn for the opening to turn.
(The opening to turn should be located away from the hood fabric.)
8. Use the opening to turn it right side out and neatly trim it. Make sure to trim it so that the corners are clearly visible.9. Iron the opening to sew securely, then iron again to tidy up and it’s finished!
3. Twinkling star shape
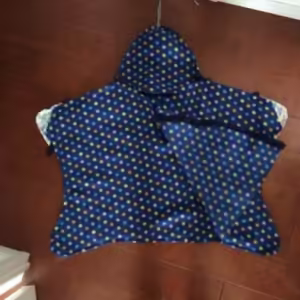
It has such a unique shape that at first glance it may not look like a swaddling cloth! A baby wrapped in it will look like an angel from the sky.
This piece has a chic pattern so it looks practical, but it would also be cute if you made it in a plain, unconventional color! If you take a photo with the right background, it will surely become one of your favorite images that you’ll want to use as your wallpaper.
material
-Four different sizes for the outer fabric
-Four different sizes for the lining as well (it is possible to make the item without this)
Prepare a pattern like the one below.
The fabric in the image is a single piece of fabric folded in half to form a loop. Prepare the same number of pieces of fabric for the lining in the same shape.
This is the finished size of the pattern, so cut it taking into consideration the seam allowance. (In this case, the hood, front seams, and hand covers will be piped, so there is no need to worry about leaving a seam allowance where you plan to pipe.)
How to make it
1. Transfer the pattern onto the fabric. Cut and prepare the materials.
2. Material ①: This fabric will be the hand covers.
Pipe the hand covers. (Only if using a lining.)
3. Material ②: This will be the back body.
Sew the hand covers made in step 1 to the back body where the hands will be. (The top part of the star will be the head.)
If you are adding a lining, sew it firmly here. If you are not adding a lining, temporarily secure it and proceed to the next step.
4. Material ③: This will be the hood.
Sew it to the head part of the back body made in step 3. If you are adding a lining, attach one side with pipes and then sew.
If you would like to add a pompom or something to the top, attach it at this stage.
5. Material ④: This will be the front body.
Place it on top of the back body made in step 4 and sew together.
6. Place the front body over the hand covers and sew all the way around.
At this time, do not sew the flat part where the hands will come out, but stop short. Layer the lining together and continue sewing.
If you are adding a lining, sew only the front side, leaving the part that will be on the inside when you join the pieces together.
7. Sew both sleeves if you are adding a lining only.
For the flat part that will become the inside of the hand cover, first sew the front and back together with the wrong sides facing each other.
8. If you are adding a lining only, turn the lining inside out and sew everything together.
Turn the lining inside out and place it over the outer fabric to shape it. It is a good idea to start
sewing the piping part from the hood. Pipe the joining parts before sewing the bottom.
Match the remaining parts at the bottom with alternating stitches, then hide the cut edges at the end.
9. Turn it inside out and shape it to finish!
*If you are not adding a lining, sew steps 3 to 6 after step 1, and pipe the cut edges.
This time we covered the seam allowance, but it can be made easier by joining everything together, sewing all the way around, and then piping the edges.
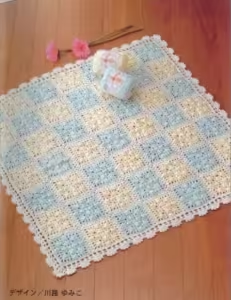
4. Patchwork is a labor of love!
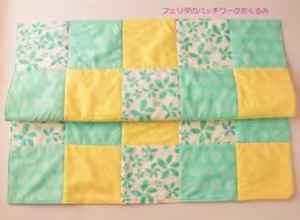
Some people may find patchwork difficult to make by layering many small pieces of the same size. The key to making it well is to layer the pieces so they don’t shift and to remember to iron them! This swaddling cloth
is a handmade kit from Felida, so it contains a breathable waterproof cloth. After using it as a swaddling cloth, it can be reused as a sheet to prevent bedwetting, so it looks like it will be useful.
Materials (Homemade Swaddling Kit Contents)
25 square cut pieces of patchwork fabric (18cm x 18cm)
Fleece fabric
100% organic cotton fabric
Breathable waterproof fabric
How to make it
1. First, iron the square-cut fabric and organic cotton fabric thoroughly before starting the work.
2. Lay out the square-cut fabric on the floor and decide where each fabric will be placed. (Consider the direction of the pattern.)
3. Sew the square-cut fabric together.
Neatly align the fabrics and sew them together from the back. We recommend a seam allowance of 7mm to 1cm. If you
iron the seam allowance, the color will not show through to the front, even with light-colored fabrics.
Be sure to iron after sewing!
4. After sewing all the horizontal rows together, sew the vertical rows together.
Sew carefully so that the seams overlap neatly and neatly.
If the seams overlap neatly at this time, the finished product will look more complete!
Once completed, iron firmly and press the seam allowance.
5. Place the fleece fabric neatly on top and quilt (putting fabric or cotton between two pieces of fabric and sewing) from the top.
If it is quilted neatly, the squares will be softly raised and the finished product will be cute.
*Quilting is a technique in which two pieces of fabric are layered and sewn together with cotton or other materials sandwiched between them.
Quilting prevents the layered fabric from slipping, improving heat retention and cushioning.
Quilting patchwork fabric is called patchwork quilting, and patchwork quilting makes the pattern of the patchwork areas stand out softly, resulting in a cute finish.
6. When quilting, carefully stretch the fabric to prevent wrinkles and overlap it, and be sure to pin it firmly in advance so that it does not slip while sewing. Basting the fabric in parts will reduce the chance of failure. The fleece
fabric included in the DIY kit is cut a little larger, so after quilting, cut off the excess and make it into a neat square.
7. Sew the three pieces of fabric together.
When sewing together, overlap and sew together so that the polyester jersey side of the breathable waterproof fabric is on the surface. If the polyurethane side is on the outside when sewing together with a sewing machine, it will stick to the sewing machine’s tools and make it difficult to sew neatly. The key is to sew together with the polyurethane side on the inside.
Line them up as shown in the above figure. Place the breathable waterproof fabric so that the polyester jersey side faces up, the organic cotton fabric so that the wrong side faces up, and the patchwork quilt fabric so that the right side faces up. (Layer the organic cotton outer fabric and the patchwork outer fabric so that they face each other.)
Also, adjust the size of the breathable waterproof fabric and organic cotton to match the patchwork quilt. At this time, leave about 10cm of space for the opening to turn and sew.
8. Turn it inside out so that the patchwork side is on the outside, adjust the shape, and sew the edges together.
Iron it well to make sure it is shaped properly before sewing so that it does not become distorted when finished.
For products with hoods, you can round the corners a little to make it look cute.
If the item does not contain a breathable waterproof cloth, you can quilt the entire item. If the item does contain a breathable waterproof cloth, water will leak out of the sewing machine seams when quilting, and it will no longer function as a waterproof sheet. Please be careful.
Easy to make DIY kit

We have introduced Felida’s DIY kit for patchwork swaddling, but what other kits are there? From here on, we will introduce swaddling in a different genre from the four handmade methods introduced earlier.
All you need to do is quilt over the disappearing print!
It’s a simple kit where you just follow the marks and sew. The marks are made of a mysterious fabric that disappears when washed. Thread is included so you can get started right away. It’s made of quilting material so it should produce a nice finished product that doesn’t look handmade.
There are five different patterns, all of which are so cute it’s hard to choose!
Gentle colors that can be used by both men and women
The thread generates almost no static electricity, so it is less likely to attract dust or dirt. The cotton has the opposing properties of being cool and warm, so it can be used all year round. It
may take a beginner several months to make this kit, but the key is to persevere and steadily repeat simple tasks.
Don’t give up just because you’re a beginner

Those who are not good at sewing will flinch just by looking at the drawing. However, the finished product is not something to give as a gift to others or to show off to others, but something to give to your child. No matter how clumsy it is, it will be engraved as a good memory.
When the baby grows up, he or she may realize that mom made it for them and be grateful. Consumables such as swaddling cloths are used up only once, but if you take a photo, the memory will last forever. If you
have a lot of free time during pregnancy, why not take this opportunity to overcome your aversion and make baby products?